Zooming In and Out on Filmora Timeline allows video editors to control how closely they view their editing workspace. It helps improve precision when cutting clips, arranging scenes, and adding effects. In Wondershare Filmora, you can zoom using the timeline slider, mouse scroll, or shortcut keys for faster editing efficiency.
Why Timeline Zoom Matters in Video Editing
When you are editing videos, precision is everything. A small misalignment in a cut or transition can change the entire flow of your video. This is where Filmora timeline zooming https://support.wondershare.com/how-tos/filmora/how-to-adjust-the-timeline-zoom-mode.html becomes essential.
Whether you are trimming clips, syncing audio, or arranging transitions, zooming helps you see the details clearly without losing the bigger picture. Beginners often overlook this feature, but professional editors rely on it daily to speed up workflow and improve accuracy.
In this guide, you’ll learn everything including practical steps, shortcuts, best practices, and expert editing tips. but before starting you can read our complete guide on Filmora timeline https://youtubevideoeditingservices.com/timeline-in-filmora-guide/
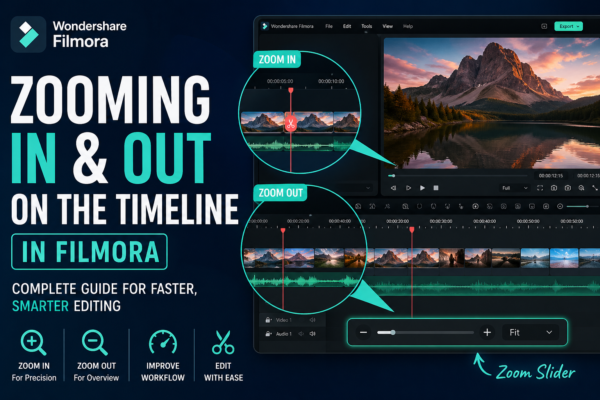
What is Filmora Timeline Zooming?
It refers to adjusting the scale of your editing timeline to either:
- Zoom in for detailed frame-by-frame editing
- Zoom out for a broader overview of your entire project
In simple terms, it controls how “close” or “far” your view is from your video timeline inside Wondershare Filmora.
Why it matters:
- Improves editing precision
- Speeds up workflow
- Helps manage large projects
- Makes clip arrangement easier
How to Zoom In and Out on Filmora Timeline
Let’s break down the most practical methods step by step.
1. Using the Zoom Slider (Easiest Method)
Filmora provides a zoom slider directly on the timeline.
Steps:
- Go to the bottom of the timeline panel
- Locate the zoom slider (+ / – control)
- Move it right to zoom in
- Move it left to zoom out
👉 This is the most beginner-friendly method for Filmora timeline zooming.
2. Using Mouse Scroll Wheel (Fast Method)
If you prefer speed, this method is ideal.
Steps:
- Hold Ctrl (Windows) or Command (Mac)
- Scroll your mouse wheel up → Zoom in
- Scroll down → Zoom out
This method is widely used by professional editors for quick adjustments during Filmora timeline zooming.
3. Using Keyboard Shortcuts
Keyboard shortcuts improve editing efficiency significantly.
- Zoom in:
Ctrl + + - Zoom out:
Ctrl + -
This method is especially useful when working on long editing sessions.
4. Fit Timeline to Screen
Sometimes you need a full overview of your project.
- Use the “Fit to Screen” option
- Automatically adjusts the timeline view
Why it is is Important for Editors
Let’s understand why professionals rely heavily on this feature.
1. Precision Editing
Zooming in allows frame-level control when cutting or trimming clips.
2. Better Audio Syncing
Helps align voiceovers and background music accurately.
3. Faster Workflow
Reduces unnecessary scrolling and improves efficiency.
4. Cleaner Project Organization
Zooming out gives a clear overview of the entire project structure.
Best Practices for Filmora Timeline Zooming
To get the most out of it follow these expert tips:
Use Zoom In for:
- Cutting precise video frames
- Adjusting transitions
- Syncing audio with visuals
Use Zoom Out for:
- Reviewing full video structure
- Arranging clips in sequence
- Checking pacing and flow
Combine Zoom with Snapping Tool
This ensures clips align perfectly while editing.
Avoid Over-Zooming
Too much zoom can slow down workflow and reduce clarity.
Real-World Example of Timeline Zooming
Imagine you are editing a YouTube vlog:
- You zoom in to cut awkward pauses
- You zoom in again to sync background music
- Then you zoom out to review the full vlog flow
Filmora Timeline Zooming vs Other Editors
Here’s a quick comparison:
| Feature | Filmora | Advanced Editors |
|---|---|---|
| Ease of use | Very easy | Complex |
| Zoom control | Simple slider + shortcuts | Multiple tools |
| Beginner friendly | Yes | No |
| Workflow speed | Fast | Moderate |
In tools like Premiere Pro or DaVinci Resolve, zooming is more advanced, but Filmora keeps it simple and beginner-friendly.
Use Cases of Filmora Timeline Zooming
🎬 YouTube Video Editing
Perfect for trimming and arranging clips smoothly.
🎓 Educational Content
Helps synchronize voice narration with slides.
🎥 Short Films
Ensures precise scene transitions.
📱 Social Media Videos
Helps quickly adjust short-form content timing.
Common Mistakes to Avoid
Many beginners struggle with Filmora timeline zooming due to these mistakes:
- Zooming too far in unnecessarily
- Not using keyboard shortcuts
- Ignoring full timeline overview
- Overlooking alignment errors when zoomed out
Avoiding these mistakes will improve your editing quality significantly.
FAQ: Filmora Timeline Zooming
1. What is Filmora timeline zooming used for?
It is used to adjust timeline view for precise editing or full project overview in Wondershare Filmora.
2. How do I zoom in on Filmora timeline quickly?
You can zoom in using:
- Mouse scroll + Ctrl
- Zoom slider
- Keyboard shortcut (Ctrl + +)
3. Why is timeline zooming important in Filmora?
It improves editing accuracy, speeds up workflow, and helps manage video structure efficiently.
4. Can I reset zoom in Filmora timeline?
Yes, you can use the “Fit to Screen” option to reset zoom instantly.
5. Is Filmora timeline zooming beginner-friendly?
Yes, Filmora offers simple zoom controls making it ideal for beginners and intermediate editors.
Conclusion
Whether you’re trimming clips, syncing audio, or organizing long projects, zoom control gives you accuracy and confidence.
By using slider controls, mouse shortcuts, and keyboard commands, you can significantly improve your editing workflow inside Wondershare Filmora.
If you consistently apply these techniques, your editing speed and video quality will improve noticeably.