But here’s the truth: once you understand the Filmora editing interface, everything starts to feel intuitive. Editing becomes less about “figuring out the software” and more about telling your story.
In this guide, you’ll learn the entire Filmora workspace in a simple, practical way—so you can start editing confidently even as a beginner.
Quick Answer
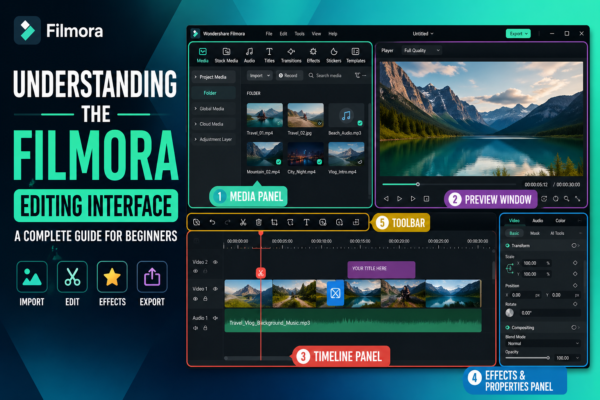
The Filmora editing interface is a user-friendly video editing workspace divided into key sections: Media Panel, Preview Window, Timeline, and Tools Panel. It allows users to import media, arrange clips, apply effects, and export videos efficiently. Once understood, it simplifies video editing for beginners and professionals alike.
What Is the Filmora Editing Interface?
The Filmora editing interface refers to the complete workspace where you edit videos inside Wondershare Filmora. It is designed to be simple, drag-and-drop based, and beginner-friendly compared to professional tools like Adobe Premiere Pro.
Key Purpose of the Interface
- Organize your video assets
- Edit clips on a timeline
- Add transitions, effects, and audio
- Preview changes in real-time
- Export final videos in multiple formats
Think of it as your digital film studio where every tool has a specific job.
Main Components of the Filmora Editing Interface
1. Media Panel (Project Library)
This is where your editing journey begins.
What it does:
- Imports videos, images, and audio files
- Stores all project assets
- Helps organize media into folders
Real-world use case:
If you’re editing a YouTube vlog, you’ll import your raw clips here first before placing them on the timeline.
2. Preview Window (Video Monitor)
The preview window shows your project in real time.
Key features:
- Play/pause timeline
- Preview transitions and effects
- Check edits instantly
Why it matters:
Instead of guessing how your video looks, you see it instantly—saving editing time and reducing errors.
3. Timeline Panel (Editing Core)
This is the heart of the Filmora editing interface.
What you can do:
- Arrange video clips in sequence
- Trim, cut, and split clips
- Add transitions between scenes
- Sync audio with visuals
Pro insight:
Most professional storytelling happens here. A well-organized timeline = a well-edited video.
4. Tools & Effects Panel
This section contains all creative editing tools.
Includes:
- Video effects
- Filters and color grading tools
- Transitions
- Text and titles
- Audio effects
Example:
Want a cinematic look? You can apply color grading filters in seconds without advanced skills.
5. Toolbar (Quick Access Controls)
The toolbar sits above the timeline and gives you fast editing controls.
Common tools:
- Cut (scissors tool)
- Undo/Redo
- Zoom timeline
- Record screen or voice
This helps speed up workflow significantly.
Step-by-Step Workflow in Filmora Interface
Understanding layout is one thing—using it is another. Here’s a simple workflow:
1: Import Media
Drag files into the Media Panel.
2: Drag to Timeline
Place clips in order on the timeline.
3: Edit Clips
- Trim unwanted parts
- Split scenes
- Adjust timing
4: Enhance Visuals
- Add transitions
- Apply filters
- Insert text or titles
5: Preview
Use the Preview Window to check final output.
6: Export
Save your video in HD, 4K, or social media format.
Key Features That Make Filmora Interface Beginner-Friendly
1. Drag-and-Drop Editing
No complex commands—just drag clips and effects.
2. Clean UI Design
Everything is visually organized and easy to find.
3. Built-in Templates
Pre-made titles, transitions, and effects reduce workload.
4. Real-time Preview
See edits instantly without rendering.
5. Cross-platform Simplicity
Works similarly on Windows and Mac.
Comparison – Filmora vs Advanced Editors
| Feature | Filmora | Advanced Editors (e.g., Premiere Pro) |
|---|---|---|
| Learning Curve | Easy | Difficult |
| Interface | Simple & visual | Complex |
| Best For | Beginners, YouTubers | Professionals, studios |
| Editing Speed | Fast | Moderate |
| Flexibility | Medium | Very High |
Conclusion from comparison:
Filmora is ideal if you want fast, clean, and efficient editing without technical complexity.
Practical Use Cases of Filmora Editing Interface
1. YouTube Content Creation
Creators use Filmora for quick editing and engaging visuals.
2. Social Media Videos
Perfect for Instagram Reels, TikTok, and Facebook videos.
3. Educational Content
Teachers and students use it for presentations and tutorials.
4. Marketing Videos
Small businesses use Filmora for promotional content.
Expert Tips to Master Filmora Interface
Tip 1: Organize Your Media
Always label clips before editing.
Tip 2: Use Shortcuts
Learn keyboard shortcuts for faster workflow.
Tip 3: Keep Timeline Clean
Avoid cluttered tracks for better editing control.
Tip 4: Preview Frequently
Don’t wait until the end—check edits regularly.
Tip 5: Experiment with Effects
Try filters and transitions but don’t overuse them.
Common Mistakes Beginners Make
- Overloading timeline with effects
- Ignoring audio quality
- Not organizing media files
- Skipping preview checks
- Using too many transitions
Avoiding these mistakes improves video quality instantly.
Frequently Asked Questions (FAQ)
1. What is the Filmora editing interface used for?
It is used to edit videos by arranging clips, adding effects, and exporting final projects in Wondershare Filmora.
2. Is Filmora good for beginners?
Yes, Filmora is designed for beginners with a simple drag-and-drop interface and pre-built editing tools.
3. What are the main parts of the Filmora interface?
- Media Panel
- Timeline
- Preview Window
- Effects Panel
- Toolbar
4. Can I edit professional videos in Filmora?
Yes, Filmora supports high-quality editing suitable for YouTube, marketing, and social media content.
5. How can I learn Filmora faster?
Practice regularly, follow tutorials, and experiment with tools inside the editing interface.
Conclusion
The Filmora editing interface is one of the most beginner-friendly video editing environments available today. Once you understand its structure—Media Panel, Timeline, Preview Window, and Effects—you unlock a smooth and creative editing workflow.
Whether you’re creating YouTube videos, social media content, or business promos, mastering this interface gives you full control over your storytelling.
Start small, practice consistently, and soon the interface will feel like second nature.