If you’ve ever added an overlay in your video and thought, “Why doesn’t this look right?” — you’re not alone. Getting the perfect size and position is what separates amateur edits from professional-looking videos.
In this guide, you’ll learn exactly how to adjust overlay position and size in Wondershare Filmora using simple steps, plus pro tips that most beginners overlook.
✅ Quick Answer
To adjust overlay position and size in Filmora, drag your overlay clip onto the timeline, select it, and use the preview window to resize by dragging corners or reposition by clicking and moving it. You can also fine-tune using the Transform settings (Scale, Position X/Y) in the editing panel for precise control.
🎬 What Is an Overlay in Filmora?
An overlay is any visual element placed on top of your main video. This could be:
- Logos (watermarks)
- Text animations
- Picture-in-picture (PIP)
- Effects, graphics, or b-roll footage
Think of overlays like stickers—you place them on top of your video to enhance storytelling.
🎯 Why Adjusting Overlay Size & Position Matters
Poorly placed overlays can:
- Block important content
- Look unprofessional
- Distract viewers
But when done right, overlays:
- Improve engagement
- Add branding
- Make videos more dynamic
🛠️ How to Adjust Overlay Position and Size in Filmora
Step 1: Import and Add Overlay
- Open Wondershare Filmora
- Import your media files
- Drag your overlay clip onto a track above your main video
Step 2: Select the Overlay Clip
Click on the overlay in the timeline. You’ll see a bounding box appear in the preview window.
Step 3: Resize the Overlay
- Drag the corner handles inward or outward
- Maintain aspect ratio by dragging from corners (not sides)
💡 Pro Tip: Avoid stretching overlays—it reduces quality.
Step 4: Reposition the Overlay
- Click inside the overlay in the preview window
- Drag it to your desired position
Common placements:
- Top-right (for logos)
- Bottom-center (for subtitles)
- Side corners (for PIP videos)
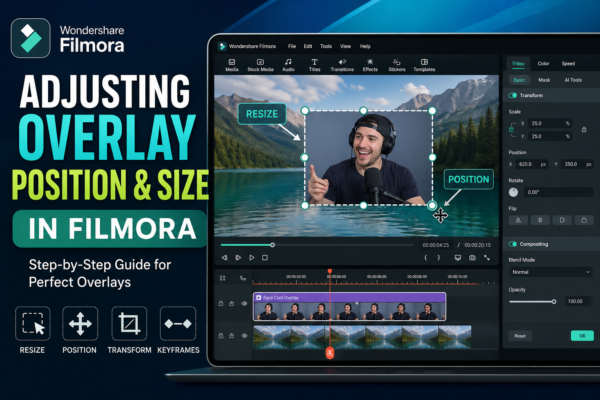
Step 5: Use Transform Settings (Precise Control)
For exact adjustments:
- Go to the Video panel
- Open Transform
- Adjust:
- Scale → controls size
- Position X → horizontal movement
- Position Y → vertical movement
This is the best method for professional editing.
🎥 Real-World Example
Imagine you’re editing a YouTube tutorial:
- Main video: Full screen
- Overlay: Face cam (bottom-right corner)
Steps:
- Resize overlay to ~25% scale
- Position at bottom-right
- Add slight margin from edges
This keeps the focus on your content while still showing personality.
⚖️ Manual Drag vs Transform Controls (Comparison)
| Method | Best For | Accuracy | Speed |
|---|---|---|---|
| Drag & Resize | Quick edits | Medium | Fast |
| Transform Panel | Precise adjustments | High | Medium |
👉 Best practice: Use both together.
💡 Pro Tips for Better Overlay Editing
1. Use Safe Margins
Keep overlays slightly away from edges to avoid cropping on different screens.
2. Maintain Aspect Ratio
Always resize proportionally to avoid distortion.
3. Add Motion (Advanced)
Use keyframes to animate overlay movement:
- Zoom in/out
- Slide transitions
4. Match Visual Style
Ensure overlays match your video’s color scheme and tone.
5. Avoid Clutter
Too many overlays = confusing video
Stick to 1–2 overlays at a time.
🚀 Common Use Cases of Overlays
📺 YouTube Videos
- Face cam overlays
- Subscribe animations
💼 Business Videos
- Logos
- Branding elements
🎮 Gaming Content
- Webcam overlay
- Live reactions
📱 Social Media Content
- Stickers
- Trending visual effects
🔗 Internal Linking Suggestions
- “How to Add Overlays in Filmora (Beginner Guide)”
- “Best Video Editing Tips for YouTube Creators”
- “Filmora Picture-in-Picture Tutorial”
🌐 External Authority References
- Filmora Official Guide: https://filmora.wondershare.com
- Video Editing Basics by Adobe
❓ Frequently Asked Questions (AEO Optimized)
1. How do I resize an overlay in Filmora?
You can resize an overlay by selecting it in the preview window and dragging its corner handles or adjusting the Scale value in the Transform panel.
2. How do I move an overlay in Filmora?
Click the overlay in the preview window and drag it to your desired position, or adjust Position X and Y values for precision.
3. Why is my overlay distorted?
This happens when you stretch it unevenly. Always resize using corner handles to maintain aspect ratio.
4. Can I animate overlay position in Filmora?
Yes, you can use keyframes to animate movement, scaling, or rotation over time.
5. What is the best overlay size for videos?
It depends on your content, but typically:
- Logos: 10–20% of screen
- Face cam: 20–30%
🎯 Conclusion
Mastering how to adjust overlay position and size in Filmora is a small skill that makes a huge difference. Once you understand both manual dragging and precise transform controls, your videos instantly look cleaner and more professional.
Start simple—resize, reposition, and refine. Then gradually move into advanced techniques like animation and layering.
👉 The difference between average and outstanding videos often comes down to these small details.