Video editing isn’t just about cutting clips anymore—it’s about storytelling. And sometimes, the difference between an average video and a professional one comes down to a single feature: masking.
If you’ve ever wondered how creators blur faces, create cinematic transitions, or reveal text inside objects, the answer is simple—masking videos in Filmora.
In this guide, you’ll learn exactly how to use masking in Filmora, even if you’re a beginner. By the end, you’ll be able to create eye-catching effects that look like they were made in high-end editing software.
✅ Quick Answer
Masking videos in Filmora allows you to hide or reveal specific parts of a video using shapes or custom selections. To use it, import your clip, select it in the timeline, open the masking tool, choose a mask shape (circle, rectangle, etc.), adjust its size and position, and apply effects like blur or color grading inside or outside the mask.
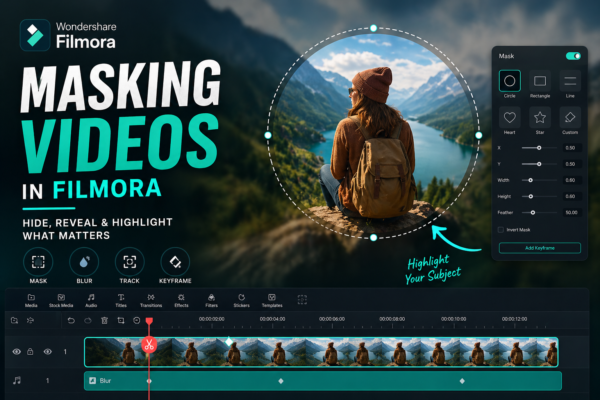
🎬 What is Masking in Filmora?
Masking is a technique used in video editing to control which parts of a video are visible or hidden.
Think of it like placing a cut-out shape over your video:
- The inside of the mask shows or gets edited
- The outside stays hidden or unchanged
Simple Example:
Imagine highlighting a person in a crowd:
- You create a circular mask around them
- Blur everything else
- Now your subject stands out instantly
🎯 Why Use Masking Videos in Filmora?
Masking isn’t just a “cool feature”—it’s incredibly practical.
Key Benefits:
- 🎥 Focus attention on specific areas
- 🔒 Hide sensitive content (faces, license plates)
- 🎨 Add cinematic effects
- ✂️ Create seamless transitions
- 💡 Enhance storytelling
🛠️ How to Mask Videos in Filmora (Step-by-Step)
Follow these simple steps to start masking like a pro:
1. Import Your Video
- Open Filmora
- Click Import Media
- Drag your video into the timeline
2. Select the Clip
Click on the video clip in the timeline to activate editing options.
3. Open Masking Tool
- Go to the Video panel
- Click on Mask
- Enable the masking feature
4. Choose a Mask Shape
Filmora offers multiple mask shapes:
- Rectangle
- Circle
- Triangle
- Heart
- Custom shapes
5. Adjust Mask Settings
Fine-tune your mask:
- Resize and reposition
- Rotate angle
- Feather edges (for smooth blending)
6. Apply Effects Inside or Outside Mask
This is where the magic happens:
- Blur background
- Color grade subject
- Add glow or highlight
7. Animate the Mask (Optional)
Want movement? Use keyframes:
- Track moving objects
- Create dynamic effects
- Make transitions smoother
🎥 Real-World Use Cases of Masking in Filmora
1. Blur Faces for Privacy
Perfect for YouTubers and vloggers:
- Apply blur effect
- Use mask over face
- Track movement
2. Cinematic Focus Effect
Highlight your subject:
- Mask subject
- Darken or blur background
- Add vignette
3. Text Reveal Effect
Create stunning intros:
- Add text layer
- Mask it within an object
- Animate for reveal
4. Split-Screen Effects
Show two scenes at once:
- Use masks to divide screen
- Add multiple clips
5. Creative Transitions
- Use moving masks between clips
- Create smooth scene changes
⚖️ Masking in Filmora vs Other Video Editors
| Feature | Filmora | Premiere Pro | After Effects |
|---|---|---|---|
| Ease of Use | ⭐⭐⭐⭐⭐ | ⭐⭐⭐ | ⭐⭐ |
| Masking Tools | ⭐⭐⭐⭐ | ⭐⭐⭐⭐⭐ | ⭐⭐⭐⭐⭐ |
| Beginner Friendly | Yes | Moderate | No |
| Advanced Control | Medium | High | Very High |
Verdict:
- Filmora is perfect for beginners and intermediate creators
- Advanced users may prefer high-end tools for complex masking
💡 Pro Tips for Better Masking
Want your edits to look professional? Follow these tips:
✔ Use Feathering Wisely
Soft edges make masks look natural.
✔ Combine with Motion Tracking
For moving subjects, tracking is essential.
✔ Keep It Subtle
Overuse of masking effects can look unnatural.
✔ Layer Your Effects
Stack blur, color grading, and lighting for depth.
🔍 Common Mistakes to Avoid
- ❌ Hard edges without feathering
- ❌ Poor alignment with subject
- ❌ Overusing effects
- ❌ Ignoring lighting consistency
❓ FAQ
1. What is masking in Filmora used for?
Masking in Filmora is used to hide or reveal specific parts of a video, allowing you to apply effects like blur, color grading, or focus to selected areas.
2. Is masking in Filmora beginner-friendly?
Yes, Filmora provides simple tools and preset shapes, making masking easy even for beginners with no prior editing experience.
3. Can I track moving objects with masking in Filmora?
Yes, you can use keyframes and motion tracking to follow moving objects and keep the mask aligned.
4. How do I blur only part of a video in Filmora?
- Add blur effect
- Apply a mask
- Adjust mask to cover the desired area
5. Does masking affect video quality?
No, masking itself doesn’t reduce quality, but excessive effects or low export settings can impact final output.
🧠 Final Thoughts
Mastering masking videos in Filmora is like unlocking a new level in video editing. It transforms your content from simple clips into engaging visual stories.
You don’t need expensive software or years of experience—just a clear idea and a bit of practice.
👉 Start small:
- Blur a face
- Highlight a subject
- Create a simple transition
Then gradually experiment with advanced techniques.
🚀 Call to Action
Ready to upgrade your editing skills?
Start practicing masking in Filmora today and turn your ordinary videos into professional-looking content. And if you’re building a content or blogging site, consider embedding your edited videos to boost engagement and SEO performance.