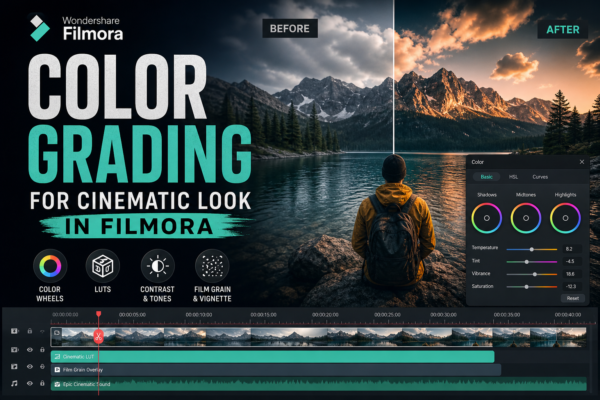
Have you ever watched a short film or YouTube video and instantly felt like it looked “professional,” even if the story was simple? That emotional impact usually comes from color grading, not expensive cameras.
In today’s content-driven world, creators using tools like Wondershare Filmora can achieve cinematic visuals without Hollywood-level budgets. The secret lies in understanding how colors shape mood, depth, and storytelling.
In this guide, you’ll learn how to create a cinematic look using color grading in Filmora, even if you’re just starting out. We’ll break down practical steps, pro tips, and real editing workflows used by creators worldwide.
What is Cinematic Color Grading in Filmora?
Cinematic color grading in Filmora is the process of adjusting colors, contrast, shadows, highlights, and tones to make your video look like a film. It involves using LUTs, color wheels, and manual adjustments to create a stylized, emotional, and visually consistent look that mimics professional cinema production.
Main Keyword Focus
Main Keyword: cinematic color grading in Filmora
Related semantic keywords:
- Filmora color correction techniques
- cinematic video editing in Filmora
- LUTs in Filmora
- Filmora advanced color grading
- video tone adjustment Filmora
- professional video look Filmora
Understanding Cinematic Color Grading
Before jumping into tools, let’s understand what makes a video “cinematic.”
Cinema-style visuals are built on:
- Controlled color palettes (not random colors)
- Soft contrast with deep blacks
- Warm highlights + cool shadows (or vice versa)
- Skin tone accuracy
- Film-like texture and consistency
Unlike basic color correction (fixing exposure or white balance), color grading is creative storytelling through color.
Step-by-Step: Cinematic Color Grading in Filmora
Step 1: Start with Proper Color Correction
Before adding cinematic effects, fix your footage:
- Adjust exposure (avoid overexposed highlights)
- Correct white balance
- Balance shadows and brightness
👉 This ensures your grading starts from a clean base.
Step 2: Use Filmora Color Wheels
Inside Wondershare Filmora, the color wheels are your best friend:
- Shadows: Add cool tones (blue/teal)
- Midtones: Keep natural skin tones
- Highlights: Warm tones (orange/yellow)
This combination creates the popular teal-and-orange cinematic style used in Hollywood films.
Step 3: Apply LUTs for Instant Film Look
LUTs (Look-Up Tables) are preset color profiles.
In Filmora:
- Go to “Color > LUT”
- Choose cinematic presets
- Adjust intensity (don’t overdo it)
Popular cinematic LUT styles:
- Teal & Orange
- Vintage Film
- Moody Dark Tone
- Golden Hour Glow
👉 Pro Tip: Always reduce LUT strength to 40–70% for natural results.
Step 4: Adjust Contrast and Saturation
For a cinematic feel:
- Reduce saturation slightly (-10 to -20)
- Increase contrast moderately
- Deepen blacks without crushing details
This creates a “film-like depth” instead of a flat digital look.
Step 5: Add Film Grain and Texture
Real cinema isn’t perfectly smooth.
Add:
- Film grain (light amount)
- Slight vignette (edges darker)
- Subtle sharpening
These effects help replicate analog film aesthetics.
Step 6: Match Color Across Clips
If you’re editing multiple shots:
- Use “Color Match” tool in Filmora
- Ensure all clips have the same tone
- Avoid inconsistent lighting shifts
Consistency = professional storytelling.
Use Cases: Where Cinematic Color Grading Works Best
1. Travel Videos
Enhances landscapes, sunsets, and city lights.
2. YouTube Cinematic Vlogs
Makes everyday footage look film-quality.
3. Short Films
Builds emotional storytelling depth.
4. Music Videos
Creates mood-driven visual identity.
5. Brand Ads
Improves professional perception and trust.
Cinematic Color Grading vs Basic Color Correction
| Feature | Color Correction | Cinematic Color Grading |
|---|---|---|
| Purpose | Fix errors | Create mood/style |
| Focus | Exposure & balance | Emotion & storytelling |
| Tools | Basic sliders | LUTs, wheels, curves |
| Result | Clean footage | Film-like visuals |
Pro Tips for Better Cinematic Results
- Shoot in flat profile (if possible) for more grading control
- Avoid oversaturation
- Stick to 2–3 dominant colors in your video
- Study movie references (Netflix films, cinema trailers)
- Use natural light whenever possible
Common Mistakes to Avoid
Even experienced editors make these mistakes:
- Overusing LUTs (makes footage unrealistic)
- Pushing contrast too high
- Ignoring skin tones
- Using too many colors in one frame
- Not matching clips properly
👉 Remember: cinematic doesn’t mean “colorful,” it means “intentional.”
Expert Insight
Professional editors often say:
“Good color grading doesn’t call attention to itself—it supports the story.”
From an industry perspective, tools like Filmora are ideal for creators because they balance simplicity with advanced controls. While high-end tools like DaVinci Resolve are used in Hollywood, Filmora provides enough flexibility for YouTube creators, freelancers, and digital marketers to achieve strong cinematic output.
Frequently Asked Questions (FAQ)
1. What is cinematic color grading in Filmora?
It is the process of adjusting colors, contrast, and tones in Filmora to create a film-like visual style.
2. Is Filmora good for color grading?
Yes, Filmora offers LUTs, color wheels, and manual adjustments suitable for beginner to intermediate cinematic grading.
3. What is the best LUT for cinematic look?
Teal & Orange LUTs are most commonly used, but subtle film-style LUTs often give more natural results.
4. How do I make my video look cinematic in Filmora?
Use proper lighting, apply LUTs, reduce saturation slightly, and adjust shadows and highlights for depth.
5. Do I need professional skills for color grading in Filmora?
No, basic understanding of color balance and practice is enough to achieve cinematic results.
Conclusion: Turn Ordinary Clips into Cinematic Stories
Cinematic color grading is not about complexity—it’s about intentional visual storytelling. With tools like Wondershare Filmora, anyone can transform simple footage into emotionally engaging content.
By mastering LUTs, color wheels, and tonal balance, you’re not just editing videos—you’re shaping how people feel your story.
If you’re serious about improving your video quality, start practicing small adjustments today. Over time, your cinematic style will naturally develop.











