Video editing is all about storytelling—and sometimes, the most powerful moment is when everything stops. A freeze frame can highlight emotion, emphasize a detail, or create dramatic impact. If you’ve ever watched a video pause on a key moment with text or effects layered on top, you’ve seen this technique in action.
In this guide, you’ll learn exactly how to freeze a frame in Filmora, along with practical tips, real-world examples, and expert insights to make your edits stand out.
Quick Answer
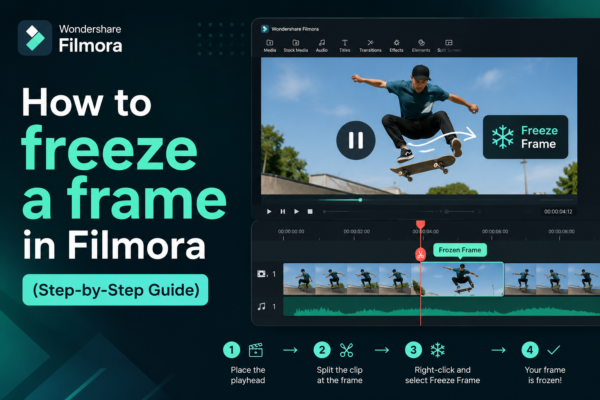
To freeze a frame in Filmora, place your playhead on the desired frame, right-click the clip, and select “Add Freeze Frame.” Filmora will automatically create a still image from that frame and insert it into your timeline. You can then adjust its duration, add effects, or include text overlays for emphasis.
What Does “Freezing a Frame” Mean?
A freeze frame is a technique where a single frame of a video is paused and displayed for a longer duration. Instead of continuous motion, the video momentarily stops, creating a still image effect.
Why editors use freeze frames:
- Highlight important moments
- Add dramatic pauses
- Introduce titles or captions
- Create storytelling impact
- Emphasize reactions or expressions
Think of sports replays, YouTube intros, or cinematic storytelling—freeze frames are everywhere.
How to Freeze a Frame in Filmora (Step-by-Step)
Let’s walk through the exact process.
Method 1 – Using the Right-Click Option (Fastest Way)
- Import your video into Filmora
- Drag the clip onto the timeline
- Move the playhead to the frame you want to freeze
- Right-click on the clip
- Select “Add Freeze Frame”
- A still frame will appear in your timeline
That’s it. Filmora automatically generates the freeze frame for you.
Method 2 – Using the Toolbar (Alternative Method)
- Select your clip in the timeline
- Position the playhead at the desired moment
- Click the Freeze Frame icon (snowflake symbol) in the toolbar
- Filmora inserts the frozen frame instantly
Adjusting Freeze Frame Duration
After creating the freeze frame:
- Drag the edges of the frozen clip to increase or decrease duration
- Typical durations:
- 1–2 seconds for quick emphasis
- 3–5 seconds for storytelling or text overlays
Real-World Use Cases (Where Freeze Frames Shine)
1. YouTube Intros
Creators freeze a moment and add:
- Channel name
- Sound effects
- Zoom-in animations
2. Educational Videos
Pause the frame to:
- Explain a concept
- Add annotations
- Highlight details
3. Social Media Content
Freeze frames help:
- Grab attention
- Create viral-style edits
- Add humor or captions
4. Cinematic Storytelling
Use freeze frames to:
- Emphasize emotional reactions
- Create suspense
- Transition between scenes
Pro Tips to Make Your Freeze Frames Look Professional
Here’s where most beginners go wrong—they freeze the frame but don’t enhance it.
1. Add Motion (Zoom Effect)
A static freeze frame can feel dull. Add:
- Slight zoom-in (Ken Burns effect)
- Pan movement
2. Use Text Overlays
Add:
- Titles
- Character names
- Funny captions
3. Apply Sound Effects
A simple “whoosh” or “hit” sound makes a big difference.
4. Use Color Grading
Make the frozen frame pop with:
- Increased contrast
- Color filters
- Cinematic LUTs
5. Add Freeze + Blur Background
Duplicate the frame:
- Blur the background
- Keep subject sharp
This creates a professional, modern look.
Freeze Frame vs Snapshot – What’s the Difference?
| Feature | Freeze Frame | Snapshot |
|---|---|---|
| Purpose | Pause video moment | Export still image |
| Usage | Timeline editing | External use (image file) |
| Editing | Adjustable duration | Static image |
| Best For | Video storytelling | Thumbnails/screenshots |
Key Insight:
Use freeze frame for editing, snapshot for exporting images.
Common Mistakes to Avoid
Even simple features can go wrong if misused.
❌ Freezing the wrong frame
Always zoom in and choose the exact moment.
❌ Too long duration
A 10-second freeze can feel awkward unless intentional.
❌ No enhancement
Plain freeze frames look unprofessional—add effects.
❌ Poor timing
Freeze frames should match the beat or emotion of the video.
Best Practices for High-Quality Freeze Frames
- Choose sharp, high-resolution frames
- Avoid motion blur frames
- Sync freeze with audio beats
- Combine with transitions
- Keep it purposeful (don’t overuse)
FAQs
1. How do I freeze a specific frame in Filmora?
Place the playhead on the exact frame, right-click the clip, and select “Add Freeze Frame.” Filmora will create a still frame instantly.
2. Can I adjust the duration of a freeze frame?
Yes. Simply drag the edges of the freeze frame clip on the timeline to increase or decrease its duration.
3. Does freezing a frame reduce video quality?
No. Filmora uses the original frame from your video, so quality remains the same unless the source video is low resolution.
4. Can I add effects to a freeze frame?
Absolutely. You can apply:
- Filters
- Text
- Animations
- Sound effects
Just like any other clip.
5. What is the shortcut for freeze frame in Filmora?
Filmora may not have a universal default shortcut, but you can use the toolbar freeze icon or right-click method for quick access.
Conclusion (Final Thoughts + CTA)
Freezing a frame in Filmora is one of those simple techniques that can dramatically improve your videos when used correctly. Whether you’re creating YouTube content, educational tutorials, or cinematic edits, a well-placed freeze frame can grab attention and enhance storytelling.
The real magic happens when you go beyond just freezing—add motion, text, sound, and style to make your content truly stand out.
👉 Now it’s your turn:
Open Filmora, try freezing a frame, and experiment with effects. You’ll be surprised how much impact a single paused moment can create.











