Uploading a video to YouTube shouldn’t feel like a gamble. Yet many creators hit “Export” in Wondershare Filmora only to end up with blurry visuals, massive file sizes, or awkward compression after uploading to YouTube.
If that sounds familiar, you’re not alone.
The good news? With the right export settings, you can dramatically improve video quality, reduce upload time, and even boost your channel’s performance. This guide breaks it all down in a practical, easy-to-follow way.
Quick Answer (Best Filmora Export Settings for YouTube)
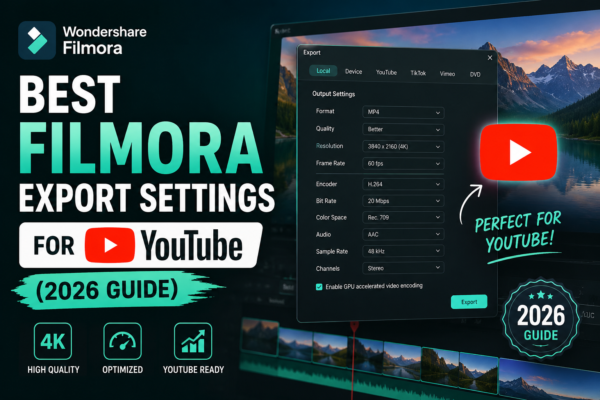
For the best results, export your Filmora videos using:
- Format: MP4 (H.264 codec)
- Resolution: 1920×1080 (Full HD) or 3840×2160 (4K)
- Frame Rate: Match source (usually 30fps or 60fps)
- Bitrate: 8–16 Mbps (1080p), 35–45 Mbps (4K)
- Audio: AAC, 320 kbps
These settings ensure high-quality playback with optimal compression on YouTube.
Why Export Settings Matter for YouTube
YouTube compresses every video you upload. That means even if your video looks perfect on your computer, it can lose quality after processing.
Using the correct Filmora export settings for YouTube helps:
- Preserve sharpness and clarity
- Avoid pixelation and blur
- Reduce unnecessary file size
- Speed up uploads
- Improve viewer experience
Think of export settings as your “final polish” before your video goes live.
What Are the Best Export Settings in Filmora?
Let’s break this down into actionable steps you can apply immediately.
1. Choose the Right Format (MP4 + H.264)
When exporting from Filmora:
- Select MP4 format
- Use H.264 codec
Why this works:
- Best compatibility with YouTube
- Efficient compression without quality loss
- Faster upload speeds
👉 Avoid formats like AVI or MOV unless you have a specific reason.
2. Set the Correct Resolution
Your resolution should match your project and audience expectations.
| Use Case | Resolution |
|---|---|
| Standard videos | 1920×1080 (1080p) |
| High-quality | 2560×1440 (2K) |
| Premium content | 3840×2160 (4K) |
Pro Tip:
Even if your footage is 1080p, exporting in 4K can sometimes improve YouTube compression quality.
3. Match Frame Rate (FPS)
Always match your export frame rate with your original footage:
- 24fps → Cinematic look
- 30fps → Standard YouTube videos
- 60fps → Gaming, sports, fast motion
Mistake to avoid:
Changing FPS unnecessarily can cause stuttering or unnatural motion.
4. Optimize Bitrate for Quality vs Size
Bitrate directly affects video quality and file size.
Recommended Bitrate Settings:
- 1080p → 8–16 Mbps
- 1440p → 16–24 Mbps
- 4K → 35–45 Mbps
Simple rule:
Higher bitrate = better quality (but larger file)
5. Audio Settings That Actually Matter
Don’t overlook audio—it’s half your video experience.
Set:
- Format: AAC
- Bitrate: 320 kbps
- Sample Rate: 48 kHz
This ensures crisp, professional sound quality.
Step-by-Step: How to Export in Filmora for YouTube
Follow these steps inside Filmora:
- Click Export
- Choose Local
- Select MP4 format
- Click Settings
- Adjust:
- Resolution
- Frame rate
- Bitrate
- Click Export
Or use the YouTube preset, but always double-check settings manually for best results.
Real-World Example (Beginner vs Optimized Export)
Beginner Export:
- Default settings
- Low bitrate
- Result: blurry video after upload
Optimized Export:
- 1080p, 12 Mbps bitrate
- Matched FPS
- Result: sharp, professional video
Small tweaks = big difference.
Best Export Settings by Content Type
1. For YouTube Vlogs
- 1080p, 30fps
- 10–12 Mbps
- Balanced quality and file size
2. For Gaming Videos
- 1080p or 4K, 60fps
- 20–40 Mbps
- Smooth motion + detail
3. For Tutorials (Screen Recordings)
- 1080p, 30fps
- 8–10 Mbps
- Focus on clarity, not motion
Filmora vs Other Export Options (Quick Comparison)
| Feature | Filmora Export | Advanced Editors |
|---|---|---|
| Ease of use | ⭐⭐⭐⭐⭐ | ⭐⭐⭐ |
| Customization | ⭐⭐⭐⭐ | ⭐⭐⭐⭐⭐ |
| Speed | Fast | Medium |
| Beginner-friendly | Yes | No |
Filmora strikes a great balance between simplicity and control.
Common Mistakes to Avoid
- ❌ Using very low bitrate
- ❌ Exporting in wrong resolution
- ❌ Changing FPS unnecessarily
- ❌ Ignoring audio quality
- ❌ Using outdated codecs
Fixing these alone can instantly improve your uploads.
Pro Tips for Better YouTube Quality
- Export slightly higher than needed (YouTube compresses anyway)
- Use 2-pass encoding if available
- Upload during off-peak hours for faster processing
- Always preview your exported file before uploading
FAQ
1. What is the best format for YouTube uploads in Filmora?
The best format is MP4 with H.264 codec. It offers high quality with efficient compression and is fully supported by YouTube.
2. What bitrate should I use for 1080p videos?
Use 8–16 Mbps for 1080p videos. This ensures good quality without unnecessarily large file sizes.
3. Should I export in 4K for YouTube?
Yes, if possible. Even if your footage is 1080p, exporting in 4K can improve YouTube compression and overall video quality.
4. Does frame rate affect YouTube quality?
Yes. Matching your source frame rate (30fps or 60fps) ensures smooth playback and avoids motion issues.
5. Why does my video look blurry after uploading?
This usually happens due to:
- Low bitrate export
- YouTube processing not finished
- Incorrect resolution
Conclusion
Getting the best Filmora export settings for YouTube isn’t complicated—it just requires a bit of understanding and attention to detail.
Once you dial in the right combination of resolution, bitrate, and format, your videos will look sharper, load faster, and perform better overall.
If you’re serious about growing on YouTube, don’t treat export settings as an afterthought. Treat them as your final step toward professional-quality content.
Next step: Open Filmora, apply these settings, and test the difference yourself—you’ll notice it immediately.